AIBench Basics
Create a new AIBench Project
You will need to install Maven.
Simply run the following command to create a new AIBench application using the Maven archetype:
mvn archetype:generate -DarchetypeGroupId=es.uvigo.ei.sing \
-DarchetypeArtifactId=aibench-archetype -DarchetypeVersion=2.8.2 \
-DgroupId=es.uvigo.ei.sing -DartifactId=my-aibench-application \
-DinteractiveMode=false \
-DarchetypeRepository=http://sing.ei.uvigo.es/maven2
This command creates the new application under the folder
my-aibench-application. You can select the version of the archetype
(corresponding to the AIBench version) in -DarchetypeVersion.
Now you can use your favourite Java Editor or IDE to start Creating Operations.
Your project main directories
Once you have created your new project, this is the typical directory structure you will find.
.
├── pom.xml
└── src
    └── main
        ├── global-resources
        │   ├── conf
        │   │   ├── aibench.conf
        │   │   ├── core.conf
        │   │   ├── log4jconfig
        │   │   ├── pluginmanager.conf
        │   │   ├── plugins.conf
        │   │   ├── template.xml
        │   │   └── workbench.conf
        │   ├── run.bat
        │   └── run.sh
        ├── java
        │   └── es
        │       └── uvigo
        │           └── ei
        │               └── sing
        │                   └── Sum.java
        └── resources
            └── plugin.xml
The above directories include:
pom.xmlfile. The Maven file controlling the build lifecycle of your application (see Maven chapter). Here you will need to add your third-party libraries dependencies as well as other AIBench plugins dependencies.src/main/resources/plugin.xml. The plugin.xml file. This file is a key file declaring all your AIBench artifacts and configurations.src/main/java. The Java source code of your plugin. Where you add Java classes implementing AIBench Operations, Datatypes and Views.src/main/global-resources. Resources that are application scoped, not plugin scoped. For example, application configuration files, and run scripts.src/main/resources. Resources needed by your plugin (non-Java files), such as icons, text-files, etc.
Building and Running
To build the project, just run:
cd my-aibench-application
mvn package
An finally, to run your application:
cd target/dist
sh run.sh
Creating Operations
Defining the operations with Annotations
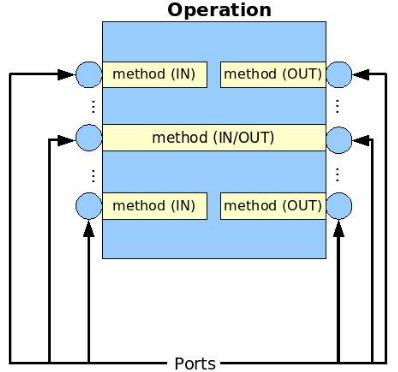
An Operation is a Java class where each port is associated with a method that:
- Receives the incoming data through a parameter (if the port is INPUT).
- Produces output data with the return value (if the port is OUPUT).
- Both (if the port is INPUT/OUPUT).
In order to create a new Operation, you need to define a class, annotate it and connect it to AIBench through the plugin.xml file that must be present in you plugins in the path described in the chapter Downloading AIBench and building plugins. The annotations needed to create your own operations are described bellow.
An example of an Operation class could be:
@Operation(name = "Sum", description = "this operation adds two numbers")
public class Sum {

  private int x, y;

  @Port(direction = Direction.INPUT, name = "x param", order = 1)
  public void setX(int x) {
    this.x = x;
  }

  @Port(direction = Direction.INPUT, name = "y param", order = 2)
  public void setY(int y) {
    this.y = y;
  }

  @Port(direction = Direction.OUTPUT, order = 3)
  public int sum() {
    return this.x + this.y;
  }
}
The example defines an Operation with three ports: the first
two are INPUT ports and the last one is an OUTPUT port.
@Operation annotation
This annotation is a class annotation, that must be present in all Operation classes. The attributes of this annotation are showed in the following table.
| Attribute name | Type | Description | Default |
|---|---|---|---|
| name | String | The name of the Operation. This will be used, for example, in the menus. This value also can be established in the plugin.xml | empty string |
| description | String | A briefly description of the Operation. This text appears, for example, in the header of the dynamic dialogs generated by the Workbench. | <empty string> |
@Port Annotation
With this annotation you can define all the things related with a port. This annotation appears before the method that will be associated with the port. The attributes of this annotation are showed in the following table.
| Attribute name | Type | Description | Default |
|---|---|---|---|
| name | String | The name of the port. This text will e used, for example, to render a label in the dynamic dialogs | <empty string> |
| description | String | A brief description of the port. This text appears, for example, near to the respective control dialogs. | <empty string> |
| direction | Direction (enumerated type) | The data flow direction. One of: INPUT,OUTPUT,BOTH. | Direction. BOTH |
| order | int | The order in which this port is invoked. However, INPUT/BOTH ports are always invoked before OUTPUT ports | -1 |
| lock | boolean | If this is an INPUT/BOTH port, indicate that the operation will write on the input object, so no other operations using this item can run in parallel | false |
| defaultValue | String | The default value of the port (must be an INPUT or BOTH port). This value will be used, for example, to populate the input dialog with default values. The value cannot be used to set CLIPBOARD values, only primitives, and for classes with a String constructor. | <empty string> |
| advanced | boolean | Hint indicating that this parameter is not essential, so its default value should be valid in almost all cases. Moreover this parameters are displayed hidden initially. | false |
| extras | String | Additional parameters can be passed here. | <empty string> |
@Port extras
Additional parameters can be passed here. Parameters are delimited by , and
values can be assigned to properties with parameter=value.
File ports
Ports of type File can use the following three parameters to configure the file
chooser showed to the user:
selectionMode: which can befiles,directoriesorfilesAndDirectories.filters: which must follow the formatregex:description. A predefined filter isallowAll, which allows user to select all files. For example, the filter.*\\.csv|: Comma-separated values (CSV) filesallows only selection of files with csv extension. Note that adding one filter disables the “All files” selection filter and it must be explicitly added.caseSensitiveFilters: which can betrueorfalseand indicates whether regular expressions infiltersshould be evaluated as case sensitive (true, the default behaviour) or not (false).
For example, the following example shows the creation of an extras string to
configure a file chooser that only accepts files and has three filters: one for
CSV files, one for plain text files and the “All files” filter. Moreover, file filters
are evaluated as case insensitive (e.g.: the CSV files filter would show files ending
with both .csv and .CSV).
@Port(
   direction = Direction.INPUT,
   name = "File",
   order = 1,
   extras = "selectionMode=files, " +
            "filters=" +
               ".*\\.csv|:Comma-separated values (CSV) files; " +
               ".*\\.txt|:Plain text files;" +
               "allowAll," +
             "caseSensitiveFilters=false"
)
public void setFile(File f) {
   this.file = f;
}
Enum ports
Ports of type Enum can use the following three parameters to configure the component showed
to the user:
mode: which can becomboto display enum constants in a combo box orradiobuttonsto display them as radio buttons.numrows: which specifies the number of rows whenradiobuttonsmode is used. A value of0means that it will be used as many rows as necessary.numcolumns: which specifies the number of columns whenradiobuttonsmode is used. A value of0means that it will be used as many columns as necessary.
Note that numrows and numcolumns cannot both be zero.
For example, the following example shows the creation of an extras string to configure a
port that shows enum constants in a combo box with one row and as the required number of columns.
@Port(
public enum Enum {
   A, B, C
};

@Port(
   direction = Direction.INPUT,
   name = "An enum port",
   order = 1,
   extras = "mode=radiobuttons, numrows=1, numcolumns=0"
)
public void setEnumParameter(Enum enumParameter) {
   this.enumParameter = enumParameter;
}
String ports
By default, ports of type String accept emtpy Strings as valid values. If you can’t
accept an empty String and you require a value, you can use the required
parameter.
For example, the following code shows the creation two ports of type String. While
the second one accepts an empty String, the first one does not and the Ok button
of the dialog will not be enabled until the user had introduced a value.
@Port(
   direction = Direction.INPUT,
   name = "A required String port",
   order = 1,
   extras = "required"
)
public void setNonEmptyString(String nonEmptyString) { }

@Port(
   direction = Direction.INPUT,
   name = "A String port",
   order = 2
)
public void setString(String string) { }
@Progress Annotation
This optional annotation can be used to provide a Java bean that keeps in its properties the information related with the actual progress of the Operation. The Operation should call the setter methods of the bean during its process while the Workbench monitors then in real-time showing them to the user in the progress monitor dialog. Please, refer to section Providing progress information for a deeper explanation and examples.
@Cancel annotation
This optional annotation can be used to provide de possibility of canceling the
operation when it is being executed. When a method is annotated with @Cancel, a
button is added to the operation’s progress dialog. If the user clicks this button,
two things happen:
- AIBench ignores the value(s) returned by the operation. This means that output ports results will not be added to the clipboard.
- The annotated method in your operation is called so that you can properly pause the operation. Please, note that the responsibility of stopping the execution of your operation is on you
Moreover, this annotation accepts one parameter called cancelButtonLabel that sets
the label of the cancel button in the operation’s progress dialog. Bellow if an example
of a cancel method:
private final boolean canceled = false;

@Cancel(cancelButtonLabel = "Cancel operation")
public void cancel() {
     this.canceled = true;
}
Plugging operations to the AIBench’s CORE
This section shows real examples with the use of the annotations and the configuration of the plugin.xml files to connect Operations to the AIBench Core and how to provide GUI components to the Workbench to render your Data-types.
Connecting operations
As it was explained before, an Operation must be connected to the core’s
AIBench.core.operation-definition extension. This can be done in the
plugin.xml file of the plugin where the
Operation class resides. For example
<extension
  uid="AIBench.core"
  name="AIBench.core.operation-definition"
  class="es.uvigo.ei.sing.geneCBR.dfp.DFPOperation">

  <!-- Additional operation info -->
  <operation-description
    name="Discriminant Fuzzy Patterns Filtering"
    uid= "geneCBR.preprocessing.dfp"
    path="3@Preprocessing/1@Feature selection/"
    menuName="Discriminant Fuzzy Patterns Filtering"
  />
</extension>
The relevant things are these:
class: the Java class of the Operation.<operation-description>tag: allows you to define more information about the operation.name: the name of the operation. Use this to override the name defined in the@Operationannotation.uid: an identifier useful to reference this operation from other places.path: the location in the user interface where the user can find this operation (think in a menu). Thispathis defined like a file-system path, but each item can be preceded with a number@, that establishes a desired order of the option relative to others. For example: if a operation is in@1Data/and other in@2Preprocessing/, the Workbench will create two menus in its main window, placing Data before of Preprocessing.menuName: the name which must be used for the operation in menus and toobars. If not specified, then name is used.
Validating user input
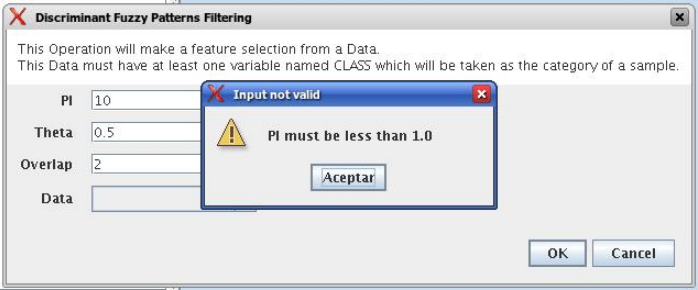
To validate the input of a port, you can use the validateMethod attribute of the @Port annotation as it was explained before. Here you can see a simple example:
... //inside the code of an operation
@Port(name="PI", direction=Direction.INPUT,
      description="ex: 0.9", defaultValue="0.9",
      validateMethod="validatePI")
public void setPI(float pi){
  this.pi=pi;
}
public void validatePI(float pi){
  if (pi>1.0)
    throw new IllegalArgumentException("PI must be less than 1.0");
}
...
The Workbench GUI uses this information to guide the user to the correct parameters. Figure 6 shows the validatePI method in action.
Providing progress information
To show detailed information about the progress of a given Operation you can use the @Progress annotation, as it was explained before. Here you can see a simple example:
@Progress
public ProgressBean getStatus(){
      return this.status;
}

@Port(direction=Direction.OUTPUT)
public void process(){
      //in the process we make changes in the progress bean
      this.status.setSubtask("doing this");
      this.status.setTotal(0.25f);
      //...
      this.status.setSubtask("doing that");
      this.status.setTotal(0.50f);
}
ProgressBean is an user-defined Java bean such as:
public class ProgressBean {
      private String subtask;
      private float total=0.0f;

      public String getSubtask() {
        return this.subtask;
      }

      public void setSubtask(String subtask) {
        this.subtask = subtask;
      }

      public float getTotal() {
        return this.total;
      }

      public void setTotal(float total) {
        this.total = total;
      }
}
By default, the Workbench GUI will show in the progress monitor all the properties of the bean, using text labels for String properties and progress bar for float properties. The name of the property is the name of the getter method, althought this can be customized using the @ProgressProperty annotation (see the following subsection for details).
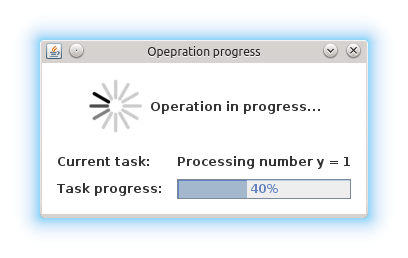
Regarding float properties, they are displayed as progress bars where their position is empty if the float value is 0.0 or less, and full if the float value is 1.0 or greater. The figure bellow shows a progress monitor that displays a bean with two properties: one String called “subtask” and one float called “total”.

Customizing the monitor progress dialog
The monitor progress dialog can be customized in several ways. Firs, the default gif
image can be changed in the workbench.conf configuration file by establishing the
value of the property progress.workingicon to the path of your custom image.
Then, the @Progress annotation has several parameters to customize the appearance of the monitor progress dialog. The attributes of this annotation are showed in the following table.
| Attribute name | Type | Description | Default |
|---|---|---|---|
| progressDialogTitle | String | The title of the progress monitor dialog. | <Progress...> |
| modal | boolean | Wether the progress monitor dialog is modal or not. | false |
| workingLabel | String | The label of the progress monitor dialog label. | <Working> |
| preferredWidth | int | The preferred width of the progress monitor dialog. | Integer.MIN_VALUE |
| preferredHeight | int | The preferred height of the progress monitor dialog. | Integer.MIN_VALUE |
Please, note that using default values for properties preferredWidth and
preferredHeight means that no preferred size should be established for the progress monitor
dialog.
Finally, bean properties can be customized using the @ProgressProperty annotation, which allows
to specify the name and the order of each property and, in the case of float properties, whether
the progress bart should be painted or not. Moreover, this annotation allows you to exclude a
getter by specifying ignore = true.
Here you can see an example of a customized progress monitor dialog and a customized Java bean:
@Progress(
    progressDialogTitle = "Operation progress",
    modal = true,
    workingLabel = "Operation in progress..."
)
public ProgressBean getStatus(){
      return this.status;
}

public class ProgressBean {
      private String subtask;
      private float total=0.0f;
      private String ignored;

      @ProgressProperty(order = 1, label = "Subtask: ")
      public String getSubtask() {
        return this.subtask;
      }

      public void setSubtask(String subtask) {
        this.subtask = subtask;
      }

      @ProgressProperty(order = 2, label = "Total progress: ", showProgressBarLabel = true)
      public float getTotal() {
        return this.total;
      }

      public void setTotal(float total) {
        this.total = total;
      }

      @ProgressProperty(ignore = true)
      public String getIgnored() {
        return this.ignored;
      }

      public void setIgnored(String ignored) {
        this.ignored = ignored;
      }
}
Regarding the order property, please note that:
- Properties with no order specified will appear before those with a specific order.
- Properties with the same order value will be displayed in the specified position but in a random order.
Creating Datatypes
Datatypes are regular Java classes. Any Java class can be a datatype.
When some operation produces an output, AIBench puts it in the Clipboard (the global structure holding all generated objects during a session in AIBench and suitable to use as input in subsequent operations).
Adding meta-data to datatypes
Objects of your datatypes appear in the AIBench Clipboard as ‘black-boxes’, that is, nodes that can not be explored internally. If you want to give access to the internal parts of your objects, you should add meta-data to describe the structure of your datatypes.
This additional Datatype meta-data is given via annotations. There are three types of Datatypes:
- SIMPLE (by default), no annotation needed.
- LIST. A datatype with a dynamic list of subelements. Note: Java arrays (with any extra information) are considered lists.
- COMPLEX. A datatype with a finite number of sub-parts.
There types can be recursively assembled. For example, a COMPLEX can have composed of an internal LIST, two COMPLEX attributes and one SIMPLE attribute.
In general, you have to use the @Datatype annotation in your Datatype, as
well as some other annotations inside those Datatypes.
@Datatype annotation
| Attribute name | Type | Description | Default |
|---|---|---|---|
| structure | Structure | The structure of the datatype. One of
SIMPLE, LIST or COMPLEX. |
SIMPLE |
| namingMethod | String | The name of a method in the class returning the name to be shown in the Clipboard tree in the application. | <empty string> |
| viewable | boolean | If the datatype can be shown with a View (default or user-provided). | true |
| renameable | boolean | If the datatype can be renamed from the user interface | true |
| removable | boolean | If the datatype can be removed from the user interface | true |
| setNameMethod | String | The name of a method to rename the datatype. | <empty string> |
| removeMethod | String | The name of a method to rename the datatype. | <empty string> |
| autoOpen | boolean | If the datatype should be automatically opened when it is added to the clipboard. | false |
@ListElements annotation
This annotation is used inside @Datatypes(structure = Structure.LIST) to
indicate a method which returns the underlying list of elements of this Datatype
(see Datatype examples).
| Attribute name | Type | Description | Default |
|---|---|---|---|
| modifiable | boolean | Indicates that the user can remove sub-elements of this LIST. If it is true, you must return the real list in your @ListElements method | true |
@Clipboard annotation
This annotation is used inside @Datatypes(structure = COMPLEX) to indicate a
method which returns a sub-part of this Datatype (see Datatype examples).
| Attribute name | Type | Description | Default |
|---|---|---|---|
| name | String | The name of the part to be shown in | mandatory |
| order | int | The relative order of this subpart in the whole COMPLEX Datatype. | MIN_VALUE |
@Property annotation
This annotation is used inside @Datatypes(structure = COMPLEX) to indicate a
method which returns a primitive sub-part of this Datatype (see
Datatype examples).
| Attribute name | Type | Description | Default |
|---|---|---|---|
| name | String | The name of the part to be shown in | mandatory |
Datatype examples
Here it is a LIST Datatype example:
@Datatype(structure = Structure.LIST)
class AList {
  ...
  private List subElems;
  ...
  @ListElements
  public List getElements() {
    return subElems;
    }
}
And a COMPLEX Datatype example:
@Datatype(structure=Structure.COMPLEX)
class AComplex {
  ...
  private AList subpart;
  ...
  @Clipboard(name = "subpart1")
  public AList getSubpart(){
    return subElems;
  }

  @Clipboard(name = "subpart2")
  public String getSubpart2(){
    return "hello";
  }

  @Property(name = "simple field")
  public int simpleField(){
    return 75;
  }
}
Advanced Datatype management
Renaming instances of your Datatypes
The AIBench Workbench allows users to rename Clipboard results, that is, instances of your Datatypes. In this section, we show you how to deal with user rename requests in order to keep your objects consistent.
As mentioned before, the @Datatype annotation has a namingMethod field
to allow a customizable way to set the name of the Clipboard
elements. A problem arises when the user changes a Clipboard
item through the built-in rename functionality (via F2, or click), because the
user object isn’t notified of this change and further inconsistences may occur.
The setNameMethod in the @Datatype annotation in intended for solving
this problem. When this method is defined, the user allows AIBench to
automatically notify the user object wrapped inside the Clipboard item that its name has changed.
To use it a user must only add the following to his @Datatypes declarations:
- The user must define a method that will receive only one argument
(
String) and will returnvoid. - As it ought to be expected, if a user defines a
setNameMethodbut doesn’t define anamingMethod, AIBench will not be able to further retrieve the correct name of the Object.
@Datatype(
  structure = Structure.COMPLEX,
  viewable = false,
  namingMethod="getName",
  setNameMethod="setName")
public class Cube {

  private String name;
  private double edge;

  public Cube(String name, double edge) {
     this.name = name;
     this.edge = edge;
  }

  public void setName(String s) {
     this.name = s;
  }

  public String getName(){
    return this.name;
  }
  ...
}
Removing instances of your Datatypes from the Clipboard
The user can also request removing elements from the Clipboard. For simple Datatypes (black-boxes) this does not poses any
special problem. However, we want to add the possibility for the user to remove
internal parts of your LIST and COMPLEX Datatypes.
In the case of LIST Datatypes, AIBench does it for you. However, in order to
work properly, you must return the real underlying structure in the
@ListElements method.
@Datatype(structure=Structure.LIST)
public class CubesList {

   private ArrayList<Cube> cubes;

   public CubesList(){
      this.cubes = new ArrayList<Cube>();
   }

   @ListElements(modifiable=true)
   public ArrayList<Cube> getCubes() {
      return this.cubes; // <---- RETURN YOUR REAL LIST INSTANCE
   }
   //...
}
In the case of COMPLEX Datatypes you have to:
Set a Root Datatype to be Not Removable using
removablein the@Datatypeannotation of the root Datatype.@Datatype(structure=Structure.COMPLEX, removable = false) public class Cube { private CubeProperties properties; @Cipboard(name = "properties") // <--- a removable subpart public CubeProperties getProperties() { return this.properties; } public void setProperties(CubeProperties properties) { this.properties = properties; } }
Define a
removeMethodin the@Datatypeannotation of the sub-element. The implementation of the method must keep your objects consistent, since AIBench will remove the visual item from the user interface.@Datatype(structure = Structure.SIMPLE, removeMethod = "remove") public class CubeProperties { private Cube owner; //... public void remove() { // 1. keep parent object consistent. this.owner.setCubeProperties(null); // 2. clean this element from the Clipboard. Note: this is // application-specific. Here we suppose that this object is // referred only by its parent, so it could be finally removed // from the clipboard. However, we have to do this manually using // the AIBench API. List<ClipboardItem> items = Core.getInstance().getClipboard() .getItemsByClass(CubeProperties.class); ClipboardItem torem = null; for(ClipboardItem item : items) { if(item.getUserData().equals(this)) { torem = item; break; } } Core.getInstance().getClipboard().removeClipboardItem(torem); } }
Datatype transformers
A transformer is a helper class to transform from one instance of a Datatype class into another.
To add a transformer to AIBench, you should:
- Create a class for the transformer with a static method in charge of doing the transformation of an instance:
public class Transformer {
  public static DestinyDataType transform(SourceDataType sourceObject) {
  // create and return the destiny instance
  }
}
- Declare the transformer in plugin.xml
<extension uid="aibench.core"
name="aibench.core.transformerdefinition">
<transformerdescription sourceType="org.someorg.SourceDataType"
destinyType="org.yourorg.YourDataType"
transformerClass="org.yourorg.Transformer"
methodName="transform"/>
</extension>
Creating Views
As it was explained before, you can connect Views to show your Datatypes instances by extending the AIBench.workbench.view
extension. This can be done in the plugin.xml file
of the plugin where the components classes resides. You can also give icons for
the operations and Datatypes. For example:
<extension uid="AIBench.workbench" name="AIBench.workbench.view" >

  <view
    name="Feature Selection Results View"
    datatype="es.uvigo.ei.sing.datatypes.featureselection.FeatureSelectionResults"
    class="es.uvigo.ei.sing.datatypes.gui.FeatureSelectionResultsViewer"/>

  <icon-datatype
    datatype="es.uvigo.ei.sing.jcbr.casebase.ExemplarsModelCaseBase"
    icon="icons/cbase.gif"/>

  <icon-operation
    operation="geneCBR.preprocessing.dfp"
    icon="icons/patterns.png"/>

</extension>
The code in the example does this:
- Defines a View which is defined with the
<view>tag. This tag must provide:
name. A symbolic name.data-type. The class of the Datatype that this View can render.class. The class of the visual component. It must inherit fromJComponent. At run-time, when an instance of the Datatypes is created, the Workbench will create an instance of the component. The data instance is passed to the component in one of these ways:
- If one field of the component class is annotated with the
@Dataannotation. In this case the Workbench will look for the setter method and use it to inject the data instance.- If
@Datais not present, the Workbench will look for a constructor with an only one parameter that must be of the same class (or superclass) of the Datatype.
- Defines one icon for a Datatype. This can be
done with the
<icon-datatype>tag which has these attributes:
datatype. The class of the Datatype.icon. A path inside the plugin’s .jar pointing to the icon’s image.
- Defines one icon for an Operations. This can be done with
the
<icon-operation>tag which has these attributes:
operation. The uid of the Operations.icon. A path inside the plugin’s .jar pointing to the icon’s image.
An schema of the implementation of the View could be:
public class FeatureSelectionResultsViewer extends JPanel {

  private FeatureSelectionResults data;

  public FeatureSelectionResultsViewer(FeatureSelectionResults data) {
    this.data = data;

    // init JComponent components as a regular Swing component
  }
}
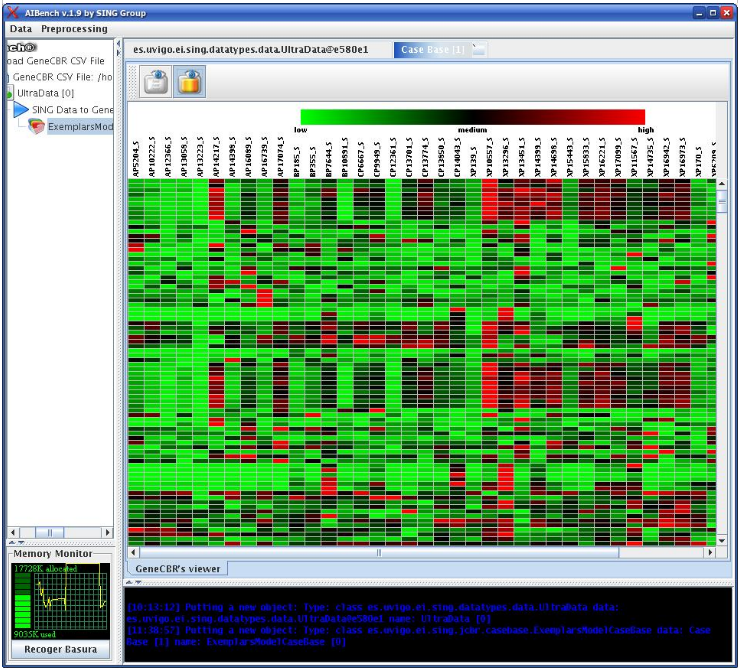
The next figure shows an sophisticated View used to display a Datatype.