Customizing your AIBench application
The configuration files
AIBench comes with several configuration files in order to change its default
behavior. They are all inside the src/main/global-resources/conf directory.
aibench.conf. Basic configuration of the AIBench runtime and bootstrap process.core.conf.Coreplugin configuration. It basically configures the thread pool size, overrides names and menu-location of Operations, and enables mutable Datatypes observation.workbench.conf.Workbenchplugin configuration. Override components visibility and placement, built-in icons, etc.template.xml. Configure the Workbench layout.
Note
Each plugin has its own configuration files, so which ones are used in a
multi-plugin application? You have only one plugin per project, so the .conf files of the plugin you run
AIBench with (./target/run.sh) are the only configuration files that will
be considered. The configuration files in dependent plugins are ignored.
Note
Why plugin.xml and .conf files? As you have seen, we have a
plugin.xml file inside each plugin, as well as
configuration files. Moreover, some configurations can be done in .conf,
as well as in plugin.xml (for example, the path defining the operations
place on the menu bar). You should keep in mind two things:
- Configuration files override
plugin.xmloptions. Theplugin.xmlis focused on default behavior, and configuration files are more focused on final customization of the application. For example, we would like to place a operation in File/Import menu when developing the plugin (we should useplugin.xml), but if we reuse this plugin in another project, we may move this operation to Dataset/Import (here we should use the configuration).- It is a good idea to define options in the
plugin.xmland, optionally in the configuration files. If your plugin will be reused in another AIBench project, remember that your configuration file will not be active in that project.
Main window configuration
The workbench.conf allows you establish the following options to customize the
main window:
mainwindow.title: it allows you to define the title of the main window.mainwindow.maximized: it can betrueorfalseand allows you to define if it must be maximized when the application starts or not.
Changing the Splash Screen
You can use your own splash by changing the splashimage parameter in
aibench.conf.
The parameter value should be relative to src/main/global-resources/. For example:
# You should create the file: src/main/global-resources/my-splash.png
splashimage = my-splash.png
Adding icons
Basic icons
You can add icons for Operations and for Datatypes. They are defined in
plugin.xml:
<extension uid="aibench.workbench" name="aibench.workbench.view" >
  <icon-operation
    operation="sampleplugin.sumoperationid"
    icon="icons/oneicon.png"/>

  <big-icon-operation
    operation="sampleplugin.sumoperationid"
    icon="icons/onebigicon.png"/>

  <icon-datatype
    datatype="sampleplugin.OneClass"
    icon="icons/othericon.png"/>
</extension>
The icon attribute indicates the path to the icon file. This path is
relative to src/main/resources of your plugin.
Overriding Workbench built-in icons
If you want to replace the Workbench (the user interface) default icons, you
have the following options in the workbench.conf configuration file.
# Clipboard root icon
icon.clipboard = icons/clipboard.gif
icon.datatype = icon/datatype.png

# Custom help icon
paramswindow.helpicon = icons/dialog-help.png

#  Dialog buttons customization
#  Ok button label and text
paramswindow.buttonicon.ok = icons/ok.png

#  Cancel button label and text
paramswindow.buttonicon.cancel = icons/cancel.png

#  Help button label and text
paramswindow.buttonicon.help = icons/help.png
Note
Icon files are relative to the AIBench root directory, so you should place
them inside src/main/global-resources. In the above configuration file,
you should create the icons subdirectory in src/main/global-resources.
Configuring the Workbench Layout
The Workbench main window shows (i) the Clipboard and the History trees at both sides (ii) the Views showing Clipboard data in de center and (iii) additional components like log at the bottom.
You can reconfigure this behavior very easy without recompiling the application.
The Workbench is implemented via a “table layout” configured in the
src/main/global-resources/conf/template.xml file.
Here it is a possible configuration of the layout.
<table>
  <row>
    <cell width="25%" oneTouchExpandable="true">
      <table>
        <row>
          <cell>
            <components id='left' />
          </cell>
        </row>
      </table>
    </cell>
    <cell width="75%">
      <table>
        <row height="80%">
          <cell width="75%">
            <document_viewer/>
          </cell>
          <cell width="25%" oneTouchExpandable="true">
            <components id='right' hidetabs="true"/>
          </cell>
        </row>
        <row height="20%" oneTouchExpandable="true">
          <cell>
            <components id='bottom'/>
          </cell>
        </row>
      </table>
    </cell>
  </row>
</table>
Here is an example of the AIBench layout running:
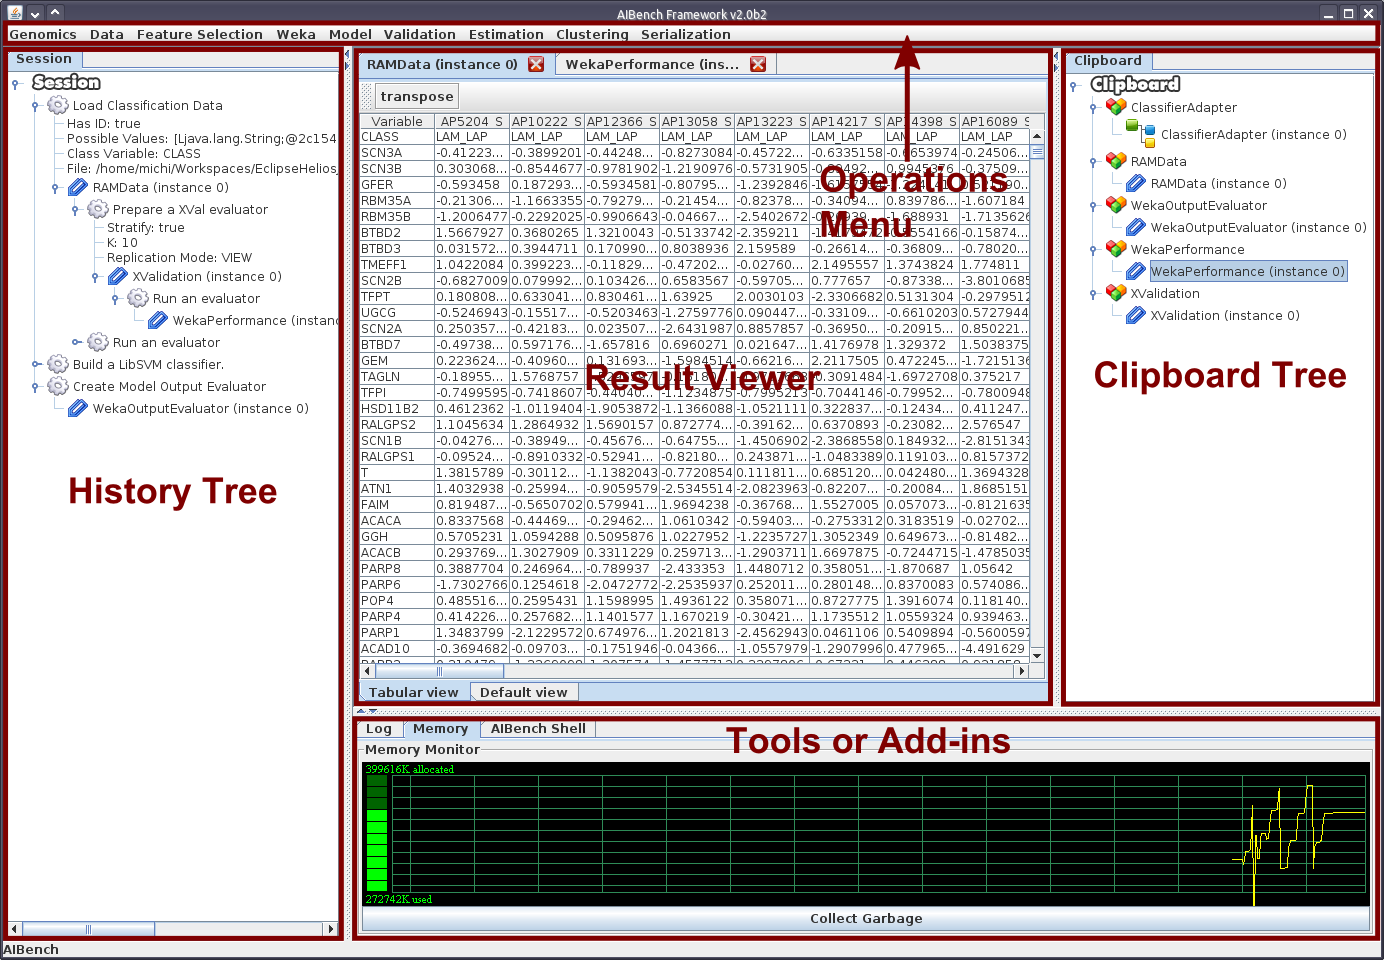
As you can see in the file, the layout is very similar to an HTML table layout, defined by rows (similar to tr) and cells (similar to td). Rows and cells can specify a default height and width, respectively. In addition, there are two additional tags:
document_viewer. This tag is where the views of the Views are shown (to view results). Normally, located at the center of the window.components. This tag defines a “slot” where one or more components could be placed. This slot has anid, so you can place custom components at these slot ids (see Adding custom components).
There are built-in components, such as the Clipboard tree or the Session (or
History) tree, among others. You can configure where they are placed or if they
are visible in the workbench.conf file:
clipboardtree.visible=true
clipboardtree.slot=right
Customizing input dialogs
If you don’t like the default generated input dialog for some operation, you can
make your own dialog. Basically you have to implement a class which implements
the es.uvigo.ei.aibench.workbench.InputGUI interface and connect it
to the Workbench in the plugin.xml file.
<extension uid="aibench.workbench" name="aibench.workbench.view" >
   <gui-operation operation="OperationUID" class="samplePlugin.ClassName"/>
</extension>
Here, samplePlugin.ClassName is your class implementing InputGUI.
To implement this interface, you can start from scratch (more complex, more flexible), or you can extend an existing class (easier, less flexible). But before continuing, you have to learn how to specify parameter values for operations in AIBench programmatically.
Specifying operation parameter values in AIBench
Note
Why do we not give simple values and use ParamSpec? AIBench is
intended to make reproducible experiments, so each value should come from a
known place, in order to be recreated in, for example, an automated
re-execution of all the user steps. This is why we use ParamSpec and
ParamSource.
You will need to create ParamSpec instances containing (i) the value of
your parameter and (ii) the origin of such value, in order to be able to
recreate the value in the future (specially in the case of complex objects).
public ParamSpec(
  String name,
  Class<?> type,
  Object value,
  ParamSource source) throws IllegalArgumentException {
    ...
}

public ParamSpec(
  String name,
  Class<?> type,
  ParamSpec[] values) throws IllegalArgumentException{
    ...
}
The first constructor is used to specify non-array values, and the second
constructor is to give array values. The ParamSource defines where the
value comes from:
public enum ParamSource {
      STRING,
      STRING_CONSTRUCTOR,
      ENUM,
      CLIPBOARD,
      SERIALIZED,
      MIXED;
}
Here you can see, where the values can be. Basically, in AIBench, a value which is forwarded to an Operation, could be:
A kind of “primitive” value:
STRING. A simple string value.STRING_CONSTRUCTORwhich is a value of a class that can receive a String in the constructor to create it (for example: Integer, Float, Double, ... and its primitive counterparts: int, float, double).ENUM. An user-defined enum constant.
A complex object:
CLIPBOARD. The value must be aClipboardItem, that is, a value previously generated with a past operation execution. You can retrieve this kind of items interacting directly with theCore, calling:Core.getInstance().getClipboard().getAllItems();
SERIALIZED. A String with a Base64-encoded serialized Java Object.
A recursive structure, that is, an array of
ParamSpec. Here we useMIXED.
Note
Create objects in this way is tedious. We provide you with a “smart” utility
that creates ParamSpec instances for you, trying to guess the correct
ParamSource. It is the CoreUtils.createParams(...) method set. You will need to
depend on the Core plugin (see Creating a dependency between plugins).
Creating your own dialog from scratch
In this alternative, you have to implement
es.uvigo.ei.aibench.workbench.InputGUI interface into your viewer class and
return an array of parameter specifications:
es.uvigo.ei.aibench.core.ParamSpec[].
public interface InputGUI {

  public void init(ParamsReceiver receiver, OperationDefinition<?> operation);

  public void onValidationError(Throwable t);

  public void finish();
}
When the user requests the execution of a given operation, the init method
of your dialog class is invoked. Here you have to start interacting with the
user, for example bringing up a modal dialog. This method receives two
parameters: a ParamsReceiver object, which must be used to send back the
parameter values of the operation and OperationDefinition, which contains
all the needed operation metadata (i.e.: its ports).
Using OperationDefinition, you could construct an user interface showing the
port names, the correct component, or not showing anything to the user if you
want, for example, to treat a given port a “hidden” parameter.
When you have calculated all the parameters, you have use ParamsReceiver
public interface ParamsReceiver {
      public void paramsIntroduced(ParamSpec[] params);
      public void cancel();
      public void removeAfterTermination(List<ClipboardItem> items);
}
With this object you can send the parameters via the paramsIntroduced
method. This method receives a ParamSpec[] array, corresponding to each
input port in its corresponding order. You have to construct a ParamSpec
instance for each port and send it in the array (see
Specifying operation parameter values in AIBench). If you do not want to invoke the
operation, you should call cancel() instead. Finally, you can request
the Core to remove some clipboard items after the operation execution, you can
use removeAfterTermination before calling paramsIntroduced.
Once paramsIntroduced is called, the Core will try to run the operation.
However, it will first validate the parameter values (see
Validating user input). If the parameters were not validated, your
onValidationError(Throwable t) method will be invoked. If the parameters are
ok and the operation can run, the finish() method will be called instead.
Overriding default dialogs
You have to extend es.uvigo.ei.aibench.workbench.inputgui.ParamsWindow,
which is the class that AIBench uses as default dialog. ParamsWindow defines
the getParamProvider(...) method, intended to be overriden in order to
change the component that will be used for a given port. This visual component
and the parameter value are specified via the returning instance of the
ParamProvider interface. The getComponent() method is used to specify
the component and the getParamSpec() method is used for the parameter’s
value (see Specifying operation parameter values in AIBench).
Let’s see the example:
public class SearchInputDialog extends ParamsWindow {
    private JTextField txt = new JTextField("Example");

    protected ParamProvider getParamProvider(
         final Port port, final Class<?> arg1, final Object arg2) {

      // change the default behavior for the port named "PortName"
      if (port.name().equals("PortName")) {

          return new AbstractParamProvider() {
            public JComponent getComponent() {
              return txt;
            }

            public ParamSpec getParamSpec()
             throws IllegalArgumentException {

              return new ParamSpec(
               port.name(), arg1, txt.getText(),
               ParamSource.STRING_CONSTRUCTOR);
               // more easy:
               // return CoreUtils.createParam(arg1);
            }

            public Port getPort() {
              return port;
            }
          };
       }

       // use the default behavior for the other ports
       return super.getParamProvider(port, arg1, arg2);
   }
}
Customizing error notifier
AIBench includes a default error dialog that is shown when an operation throw an uncontrolled exception during execution.
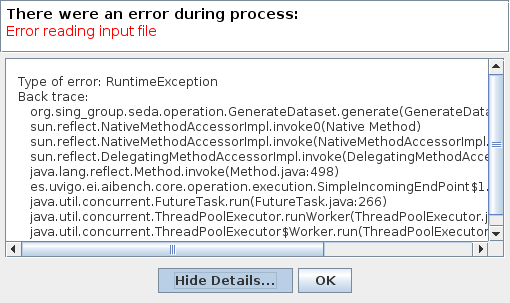
As can be seen, this dialog will show the message and the stack trace of the exception thrown. Although this is very useful during operation development, you may want to change it for final applications or in special cases where you want to show some specific information.
AIBench provides a way to change this dialog by just implementing an extension point of the Workbench plugin.
Creating your own error dialog from scratch
The first step to create a custom error dialog is to create a class that
implements the es.uvigo.ei.aibench.workbench.error.ErrorNotifier interface.
public interface ErrorNotifier {

    public void showError(MainWindow mainWindow, Throwable exception);

    public void showError(
        MainWindow mainWindow, Throwable exception, String message);

}
Once you have your own ErrorNotifier, you must declare it as an extension of
the extension point aibench.workbench.error.notifier of the
aibench.workbench plugin. Go to the plugin.xml file of your plugin and
add the following configuration to the <extensions> block.
<extensions>
    <extension uid="aibench.workbench"
               name="aibench.workbench.error.notifier"
               class="name.of.your.custom.ErrorNotifier"
    />
</extensions>
Where the name.of.your.custom.ErrorNotifier should be the complete class
name of your custom error notifier.
Once this configuration is added your AIBench will start using your custom error notifier.
Dealing with multiple error notifiers
In some cases you may have several error notifiers configured in your plugin or in several plugins. When this happens, AIBench will use the first error notifier that it can find in the plugins.
When this happens, it is recommended to specify which error notifier should be
used. To do so, you should add the error.notifier.class property to the
workbench.conf file with the name of your custom error notifier class. For
example:
# Custom error notifier (use "default" value for default error dialog
error.notifier.class = my.aibench.project.CustomErrorNotifier
In addition, in case you want to use the default error notifier instead of any
custom error notifier, you can assign the default value to this property.
# Custom error notifier (use "default" value for default error dialog
error.notifier.class = default
Adding a Toolbar
The AIBench toolbar is implemented as a shortcut system.
To get the Toolbar working you have to:
Add a new attribute in the
operation-descriptiontag in the plugin.xml,shortcut=<number_for_position>. If it is present, the Workbench plugin will use it to place it in a toolbar. The specified number will be used for positioning.<extension uid="aibench.core" name="aibench.core.operation-definition" class="sampleplugin.Sum"> <operation-description name="Sum Operation" path="10@Sample/1@SubmenuExample" uid= "sampleplugin.sumoperationid" shortcut="3"/> </extension>
You can also add an extra icon to show in the toolbar, for instance a larger icon than the default operation icon.
<extension
  uid="aibench.workbench"
  name="aibench.workbench.view" >

     <icon-operation
      operation="sampleplugin.sumoperationid"
      icon="icons/oneicon.png"/>
     <big-icon-operation
      operation="sampleplugin.sumoperationid"
      icon="icons/onebigicon.png"/>
     <icon-datatype
      datatype="sampleplugin.OneClass"
      icon="icons/othericon.png"/>

</extension>
To configure the toolbar in the
workench.confyou have four new options:# default false toolbar.visible=true # a comma-separated list of positions where a separator should # be placed after toolbar.separators=1,5,6 # default true toolbar.showOperationNames=true # toolbar position: default NORTH toolbar.position=NORTH
Adding Help to your Application
- Place your JavaHelp files in a global folder (for example:
src/main/global-resources/help). - Associate JavaHelp topics or URLs to:
1. Operations. Use the
helpattribute in theoperation-descriptiontag in your plugin.xml. The Workbench will display a help button in the input dialogs of this operations.2. Datatype Views. Use the help attribute in the
viewtag in your plugin.xml
Example:
<extension uid="aibench.core" name="aibench.core.operation-definition" class="sampleplugin.Sum">
  <operation-description
    name="Sum Operation"
    path="10@Sample/1@SubmenuExample"
    uid= "sampleplugin.sumoperationid"
    help="mytopic.subtopic"/> <!-- using JavaHelp -->
</extension>

<extension uid="aibench.workbench" name="aibench.workbench.view" >
  <view name="Sample Datatype View"
    datatype="sampleplugin.OneClass"
    class="sampleplugin.OneViewComponent"
    help="http://myapp.com/help/topic1.html"/> <!-- your help could be online -->
</extension>
Moreover, the Workbench plugin offers you a configured button
(es.uvigo.ei.aibench.workbench.utilities.HelpButton) that opens this JavaHelp. For example, this
button can be be easily added to the toolbar with:
Workbench.getInstance().getToolBar().add(new HelpButton());
Adding custom components
You can create custom components, which are any class extending JComponent,
by plugging them in your plugin.xml
<extension uid="aibench.workbench" name="aibench.workbench.view" >
  <component
    slotid="bottom"
    componentid="aibench.shell.shellWindow"
    name="AIBench Shell"
    class="es.uvigo.ei.sing.aibench.shell.ShellComponent"/>
</extension>
The slotid should exist in your template.xml file as the id of a
components tag (see Configuring the Workbench Layout).
Adding a welcome screen
You can set any component extending JComponent as welcome screen by plugging
it in your plugin.xml. This component will be added as initial tab in the views
area when the application starts.
<extension uid="aibench.workbench" name="aibench.workbench.view" >
  <welcomescreen class="org.myorg.MyComponent" title="Welcome screen" closeable="true"/>
</extension>
The closeable property allows you to specify whether this welcome screen is closeable
or not.